Friday 6 December 2013

My Life Right Now...

My life right now is a mess!
Yes a total hot mess.
I am surprisingly calm considering that I have 2 deadlines this week, the assignments for which I have yet to start.  Story of my life really.  I started my 3rd year at university with the mantra "I will not leave anything until the last minute this year" FAMOUS LAST WORDS!
I am finding myself switching between watching Youtube videos, looking at memes on Tickld, trying to buy Christmas presents for my family and just general procrastination.  Why can't I focus on the task at hand?
If I have learnt anything from my last 2 years at uni, it's that leaving everything until the last minute usually results in me sitting at my laptop until the silly hours of the morning, weeping onto my keyboard cursing the day I ever decided to go to uni. However I still manage to get the work done, just.  I seem to work so much faster under pressure, but sometimes I feel like the stress is going to give me an aneurysm.  Yet I still do it.  I know i'm not alone as on many occasions my other all nighter buddies pop up on Facebook in the same blind panic as me, asking what my word count is and then cursing the fact that they have done even less.  It's some comfort I guess.
Even now as I type, I'm putting more effort and time into writing this blog post than my assignment that is open in another window.  Actually this post is just me finding a way to procrastinate further and just so happens to be more words than I have written of my assignment, all week!
So the moral of this poorly written story is to never leave assignments until the last minutes!
It's not logical
It's not healthy
It's not fun
and it's clearly what i'm going to continue doing until I finish University!
This post has had no direction from the start so i'll end it here and return to my own personal hell.
Wish me luck

Wednesday 25 September 2013

Mini Victoria Sponge Cakes!

Hello you lovely lot :)
It's been a while since I've Blogged (slaps back of hand!) Naughty Me!
Anyway i'm back and I'll now be blogging with a vengeance so watch out!


I just wanted to share with you my recipe for these gorgeous, what I like to call, Mini Victoria Sponge Cakes!


They are basically a vanilla cupcake with a section cut out, filled with jam and then topped with buttercream!  
So simple! 
So tasty! 

So here's how I made them:

Ingredients

For the cupcakes
175g Self Raising Flour
175g Caster Sugar
175g Unsalted butter/margarine 
3 eggs
1 teaspoon of vanilla extract (good quality) 

For the buttercream
250g Icing sugar
150g Unsalted butter (softened) 
1/2 teaspoon vanilla extract
3 tablespoons of whipping cream

Also any Jam for the filling (I chose raspberry)

Method
Preheat the oven to Gas Mark 4/180'C/350F

For the cupcakes
1. With a mixer, mix together the butter and sugar until light in colour and creamy in texture.
2. Sieve in the flour, mix and then add the vanilla.
3. Finally add the eggs and mix until combined.
4. Spoon the mixture into a 12 hole muffin tray lined with muffin cases.
5. Place in centre of the oven and bake for approx 20 minutes (or until golden and springy to the touch)

For the buttercream

1. Combine butter and icing sugar with a mixer.
2. Add the vanilla and mix.
3. Add double cream and mix.  (If mixture is too dry add more cream, if too moist add more icing sugar)
4. Once cakes have cooled, cut out a round section from the centre of the top of the cupcake. (keep the cut out piece) 
5. You should have a little well, into which you should put a dollop of jam.
6. Then top the jam with as much buttercream as desired and then top with the piece that was previously cut out.  
7. Finally once they are all done, dust with a little icing sugar.

Et Voila!


Enjoy!


Wednesday 28 August 2013

Floral Nail Art!

I just wanted to quickly share my latest nail art attempt.

I was bored one night and seeing as my boyfriend was playing on his Xbox, it seemed like the perfect time to paint my nails!

I wanted to try something different, then I remembered seeing a tutorial on Youtube which involved some tooth picks and many different colour nail varnishes. 

So I decided to try a flower design and here are the results.
Scroll down to see how it's done.


I used 3 different colours, I chose a pink for the base, a green for the centre of the flowers and a pearlised white for the petals.

I would suggest using colours that complement one another for a girly, subtle look, but if you're feeling adventurous you can go for any colours you like! 

However I would recommend using a medium colour for the base, a darker colour for the centre and a light colour for the petals to make them stand out.

Method
1. Paint nails with chosen base colour.
2. Pour out a small amount of your darker and lighter colours onto a piece of paper (keep separate)
3. Use a tooth pick to dot on the centre of the flowers, once dry use another tooth pick to apply the lighter colour for the petals.
4. Once completely dry paint on your top coat of choice.


The products I used are:

- Pall Mall by Nails Inc (petals)
- Misty Jade 045 by Rimmel (centre of flowers) 
- The base colour was a gift, and was created for me using the Couture by Nails Inc service (http://www.nailsinc.com/couture) 
The closest colour match I can find is Brook Street by Nails Inc.

Enjoy! 


Tuesday 27 August 2013

Muffins! Muffins! Muffins!

Guess what I made today? 

Can you guess?

It rhymes with puffins...?

That's right...MUFFINS!!

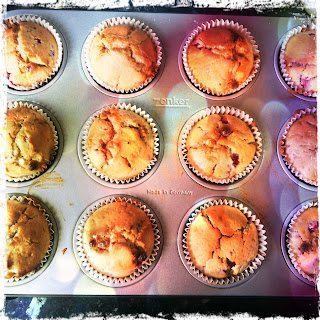
But not just any muffins, just the most delicious raspberry and white chocolate muffins.

I was in Morrisons doing a spot of shopping when I was hit with some Muffin-spiration!

We all know what a great combination raspberries and white chocolate are, don't we?  Then it dawned on me that I had never made anything with this combination before, which is just not acceptable!


So if you want to know how to make these delicious muffins, stay tuned.

Ingredients

- 300g plain flour
- 2 tsp baking powder
 150g caster sugar
- 1 large egg
 1 tsp vanilla extract
- 225ml milk
- 50g butter (melted)
- 100g fresh raspberries

- 100g chopped white chocolate or chocolate chips

Equipment

- Mixing bowl
-Electric mixer
- Measuring Jug
- Spoons
- Weighing Scales
- 12 hole muffin case
- Paper Cases
- Sieve

Method

1. Preheat the oven to 200C/Gas mark 6 and line a 12-hole muffin tin with cases.

2. Sift the flour, baking powder and sugar into a bowl.

3. In a separate bowl, crack the egg and whisk in the vanilla extract, add the milk and butter (ensure the butter has cooled before adding it to the milk as it may curdle!)

4. Stir the wet ingredients (on a low speed) into the dry.  Lightly toss the raspberries in some plain flour (this is to stop them sticking together in the mixture) then stir into mixture along with the chocolate, do not over mix!

5. Spoon the mixture into the cases and bake for 25-30 minutes and bake until well risen and just firm to the touch and a toothpick comes out clean.


They should look a little something like this!


Once cooked feel free to eat them hot or cold!
Warm, with a scoop of Carte D'or Vanilla Ice cream is my preferred method of consumption (hehe!)

Enjoy baking them and eating them, they are really worth a bake!

Until next time...


Feeling Retro with some Rollerskating!

Did someone say Rollerskating?

Yesterday, myself and two of my friends (Ruby and Becky) decided we wanted to do something fun, luckily for us,  in Swansea, a town close to where we live, has an outdoor Rollerskating rink just for the Summer. 

Let the childhood nostalgia commence!


The Rollerskating Rink is located in front of the Waterfront Museum in the centre of Swansea.  This site usually houses the Winter Wonderland (a fun fair, with a Ferris wheel and ice-skating rink) during the winter, but for the rest of the year it remains empty.  So i think it was a wise idea for Swansea Council to do something with it for the summer.

Let me tell you, it is so much fun!

I had completely forgot how fun it was to Roller-skate.  As a child I used to roller skate, roller blade and skateboard, however as I got older I lost interest.  I was a little apprehensive to start with, and had visions of ending up on my arse! 

However as soon as I hit the rink, it all came flooding back, just like riding a bike!

Overall it was a great day out with two of my closest friends and i would recommend it to anyone who fancies a bit of fun, and it's also great for kids.  

As well as Roller skating there is also:
- A Ferris Wheel
- Food Stands
- Fairground Games
- Children's Rides
- Deck Chairs
- Giant Sand Pit
- Trampolines

The roller skating is reasonably priced at;
£ 5 Adults
£ 4 Children

So if you're in Swansea and have an hour or so to spare, definitely go to the Summer Roller event, you wont regret it!

We didn't!


Thursday 22 August 2013

My Favourite Lip Products

I have recently started using more lip products.  I used to only use a bit of Chapstick and that was it!

Now it's a different story!

My collection of lip products grows almost every time I go shopping!

Here are just a few of my current favourites.

Lip Balms

I am currently loving two lip balms, and as someone who suffers from dry and cracked lips all year round, I need a good lip balm.

Two little miracle workers!

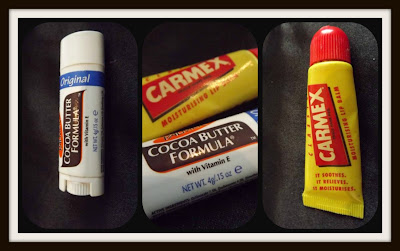
The first lip balm I use everyday is Palmer's Cocoa Butter Formula, Original Ultra Moisturizing Lip Balm.  (it's a bit of a mouthful!)
The consistency of this lip balm is gorgeous!  It is so silky and smooth that it just glides right on to your lips and leaves them feeling soft and nourished.  
It also has SPF 15 protection in it and it smells AMAZING!
How could you say no to it at just £1.89 in Boots.

The second lip balm I love to use is the Carmex Lip Balm.  This lip balm has been around for years and works wonders on chapped and sore lips.  It contains menthol and beeswax which, in turn makes your lips tingle, soothing and smoothing your lips.  Most lip balms I've tried have been a let down, only working for a few minutes before my lips are dry and chapped again.  This one however is a miracle worker, it lasts a good hour or so before you have to reapply and only costs £2-£3. A real BARGAIN!


Lip Colour

I don't tend to wear a lot of colour on my lips, I am always a bit wary of trying bold colours because I'm not sure if they'll suit me.  
However when I do wear colour on my lips i tend to go for pinks and plums, as they go with my skin tone.  

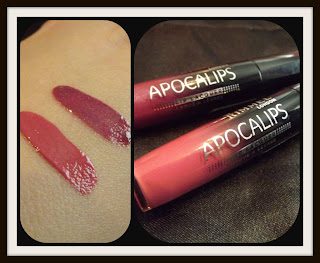
I am currently loving Rimmel's Apocalips Lip Lacquers, which are almost like a mix between a lipstick and a lip gloss.  The colour pay off is amazing with these lacquers (see swatches below).  They last ages before you need to top them up and have a gorgeous glossy look to them which makes your lips POP!  
The two colours I like the most are Galaxy and Celestial (shown below).  
They currently have a total of eight colours including a number of pinks, a nude and a gorgeous red.  
One downside to these lacquers is that they are a little difficult to apply, they tend to bleed onto the skin around your lips when first applied.  I find that using a cotton bud to touch up around your lips usually works.  You may also have to use your finger to blend it in for an even coverage.  At only £6.49 they are well worth it!

Overall these lacquers are really good if you are after a quick pop of colour to brighten up your everyday look.  

Lovely Lacquers!

Other Lip Products

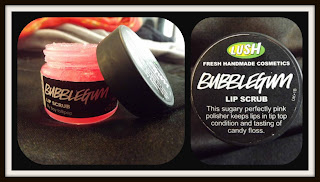
The last lip product that I've been using a lot lately was completely unknown to me until three weeks ago.  I saw this product being used on a YouTube makeup tutorial and instantly wanted to try it out for myself.  So when I was doing a spot of shopping I decided to pop into Lush and pick up a pot of their Lip Scrub.  They currently do three different flavours; Bubblegum, Popcorn and Mint Julips.  I decided to go for the Bubblegum flavour which smells and tastes like a combination of bubblegum and candyfloss.  The purpose of these scrubs is to smooth out the lip surface, removing any dry skin and creating a perfectly smooth surface to apply your favourite lip products. 

The best part about using this product has to be the taste, it is truly amazing!  

These scrubs aren't very cheap for what they are (flavoured and coloured sugar).  They will set you back £5.25 each.  

The results however are worth it!


I hope you've found this helpful and I hope you find these products as good as I did.

Let me know what your favourite lip products are so I can give them a try :D

Enjoy!


Tuesday 20 August 2013

Nutella Cupcakes

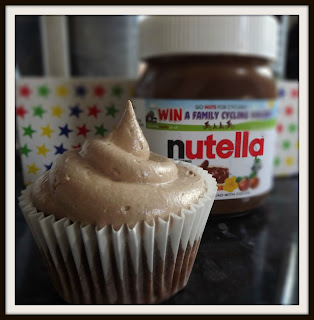
Well would you look at that! 
Has my favourite toast topping found it's way into my butter cream? 

I think it has, and let me tell you...it is AMAZING!!!

Not only are they amazing, but they are so simple to make and require very few ingredients.

Sit back and enjoy as I talk you through this delicious recipe that you can try at home.

Lets start with what you'll need:

Equipment

- Electric mixer (you can use a hand mixer but it may take longer)
- Mixing bowl (if you don't have a stand mixer with a bowl attached)
- Measuring cups and/or weighing scales
- Jug
- 12 space muffin tin
- Muffin cases (good, strong quality)
- Piping bag and nozzle

Ingredients

For the chocolate sponge:

- 110g of Self Raising flour
- 20g of cocoa powder (good quality like Bournville)
- 140g of caster sugar
- 40g of unsalted butter (room temperature)
- 120ml whole milk
- 1 egg
- 1/4 teaspoon of pure vanilla extract (or vanilla bean paste)
- a pinch of salt

For the Nutella buttercream:

- 230g unsalted butter (room temperature-take out before baking sponge)
- 250g icing sugar
- 10 tablespoons Nutella
- 70 ml of double cream (if mixture too dry, add more)
- 2 teaspoons of vanilla extract


Instructions

For the cupcakes:

1. Preheat the oven to 170C/Gas mark 3
2. Put the muffin cases in the tin
3. Sieve the flour cocoa powder and salt into the bowl
4. Add sugar and butter and mix together using electric mixer, until you get a sandy texture.
5. Whisk the milk, egg and vanilla together in a jug, then pour half into the bowl with the dry mixture, beat together until combined on a high speed to remove any lumps.
6. Turn the mixer down to a low speed and add the remaining milk and egg mixture, remembering to scrape down the sides with a spatula.  Continue mixing for a couple more minutes until smooth.
7. Spoon the mixture into the paper cases until half-two thirds full and bake in the preheated oven for 20-25 minutes, until the sponge bounces back when tapped, or a cocktail stick inserted into the middle should come out clean.
8. Remove from the cakes from the tin and leave to cool on a wire rack.


They should look something like this!

For the buttercream;

1. Beat the softened butter on a medium speed with an electric mixer for 2-3 minutes until creamy.
2. Sieve in 250g of icing sugar and continue to mix on a medium speed, it should be quite thick.
3. Add the Nutella and vanilla and continue to beat.
4. Add the double cream and mix for another 30 secs-1 minute. (if the mixture is too thick add more cream 1 tablespoon at a time.  If too thin add more icing sugar a spoon at a time). 
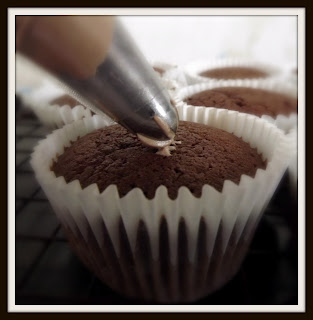
5. Add the buttercream to the piping bag and pipe onto the top of the cakes.


Sit back, relax and enjoy!
I hope you have as much fun making these beauties as I did!
After all you can never have enough Nutella in your life!

Let me know if you have any recipe requests you'd like me to do, in the comment box below :D

Enjoy!


Monday 19 August 2013

Welcome to my blog!

Hello lovely people of the world!

Welcome to my Blog!

I finally decided to make a blog after months of deliberating whether anyone would read it, whether anyone would be interested and whether I'd be any good at it.

So here it is, my blog, it's not much to look at right now, but i promise it will get better.  I hope to post two to three times a week, with a mixture of Beauty, Baking and Babbling posts.  

My Beauty posts will consist of everything beauty, be it nails, make up, skincare, haircare, hauls, reviews, likes and dislikes and much more!

My Baking posts will hope to show off my baking skills, I will be trying out recipes, baking cakes, demonstrating skills (piping, decorating, etc.) and basically as much food porn as i can cram into a post!

Finally my Babbling posts will consist of just that...babbling!  I love to talk about anything and everything!   I will share things about my life, tips and tricks, opinions, views, things I'm loving, things I'm hating, lifestyle and everything that does not fall into either Beauty or Baking.

I hope you enjoy!

Here goes nothing!